

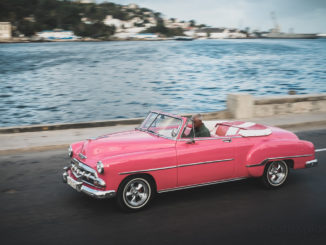
Had a few requests for a video on how I processed the truck image from the X100 so here you go! Very quick, very easy! It came out a bit different than the original but I spent less time on this one. Same steps though. Enjoy! If you want to check out Alien Skin Exposure 3, you can download a free Demo HERE.
[ad#Adsense Blog Sq Embed Image]

Your site made me aware of what am I missing. It’s a film feel and colours – thanks for letting me know about ASE – THANKS!!!
Steve,
Thanks for the Vid & insights. I was playing catch-up with your earlier posts, came across that pic and thought – man, I wish he’d relate how he processed that! I plan on picking an X100 up when I get back to the States, and I’ll be sure to route through your site.
12% discount coupon on Alien Skin…… didn’t use it myself..(yet) ..but I guess it is worth a try!
http://www.tjoos.com/Coupon/147638/alienskin.com
Thanks for the tutorial vid, Steve. It is fun to see how people work with their photos. That was GREAT!
Good work and thanks for the video, however I have to disagree with you, the editing performed was neither “easy” not “simple”. When you trivialize the ease of such a process you turn your back on all the hours you spent familiarizing yourself with the programs used. Processing is one of the most daunting aspects of digital photography. The need for an approachable method of teaching is badly needed. You have done your time in the classroom and your work reflects it, kudos sir.
That’s what I thought. Thanks for sharing your insights, Charles. I will download the trial and give it test.. D!RK
Thanks Steve! Really simple this one. Just one question left – would there be a way to actually get rid of the banding in the sky? What I could not see from the video was whether you worked in 8 or 16 bits per channel in the CS5 while applying the filters.
I have both Color Efex 3 and Exposure 3. Exposure 3 is nothing more than a bunch of film presets, which you can modify, and save your own custom settings, as well. There are over 500 color and black film presets. You can download a full working 30-day trial from Alien Skin and see for yourself.
For me, Exposure 3 is way more authentic looking than the Film Effects in Color Efex. It’s also a very simple plug-in to use. Thye even have some old dust and scratches, with slide film borders, etc…
Give it a try. It is addicting.
Great tutorial. I am wondering how Exposure 3 compared to ColorEfex. What makes you use one versus the other? I looked at the website and I get the impression that Exposure 3 has more interesting color styles. D!RK
Thanks Steve. Keep the X100 images coming. I’m still waiting for mine to ship so I am shooting vicariously through yours for the time being.
Exposure is great because you can combine layers to make your own film stock from some of your favorite films of the past!
Hi Steve,
Great video! I know the image is a little old but I’d love to see a video on how you edited your self portrait you took with the X1 in the snow. That is an awesome shot.
Thanks!
Mike
Great little how to. Thanks Steve!
Thanks for sharing your knowledge Steve, i always wonder how your images always have this quality that i cant quite put my finger on.. Thank you again!!!