
Bokehrising your iPhone shots. How to get a shallow DOF look from your phone.
by Brad Nichol – His blog is HERE
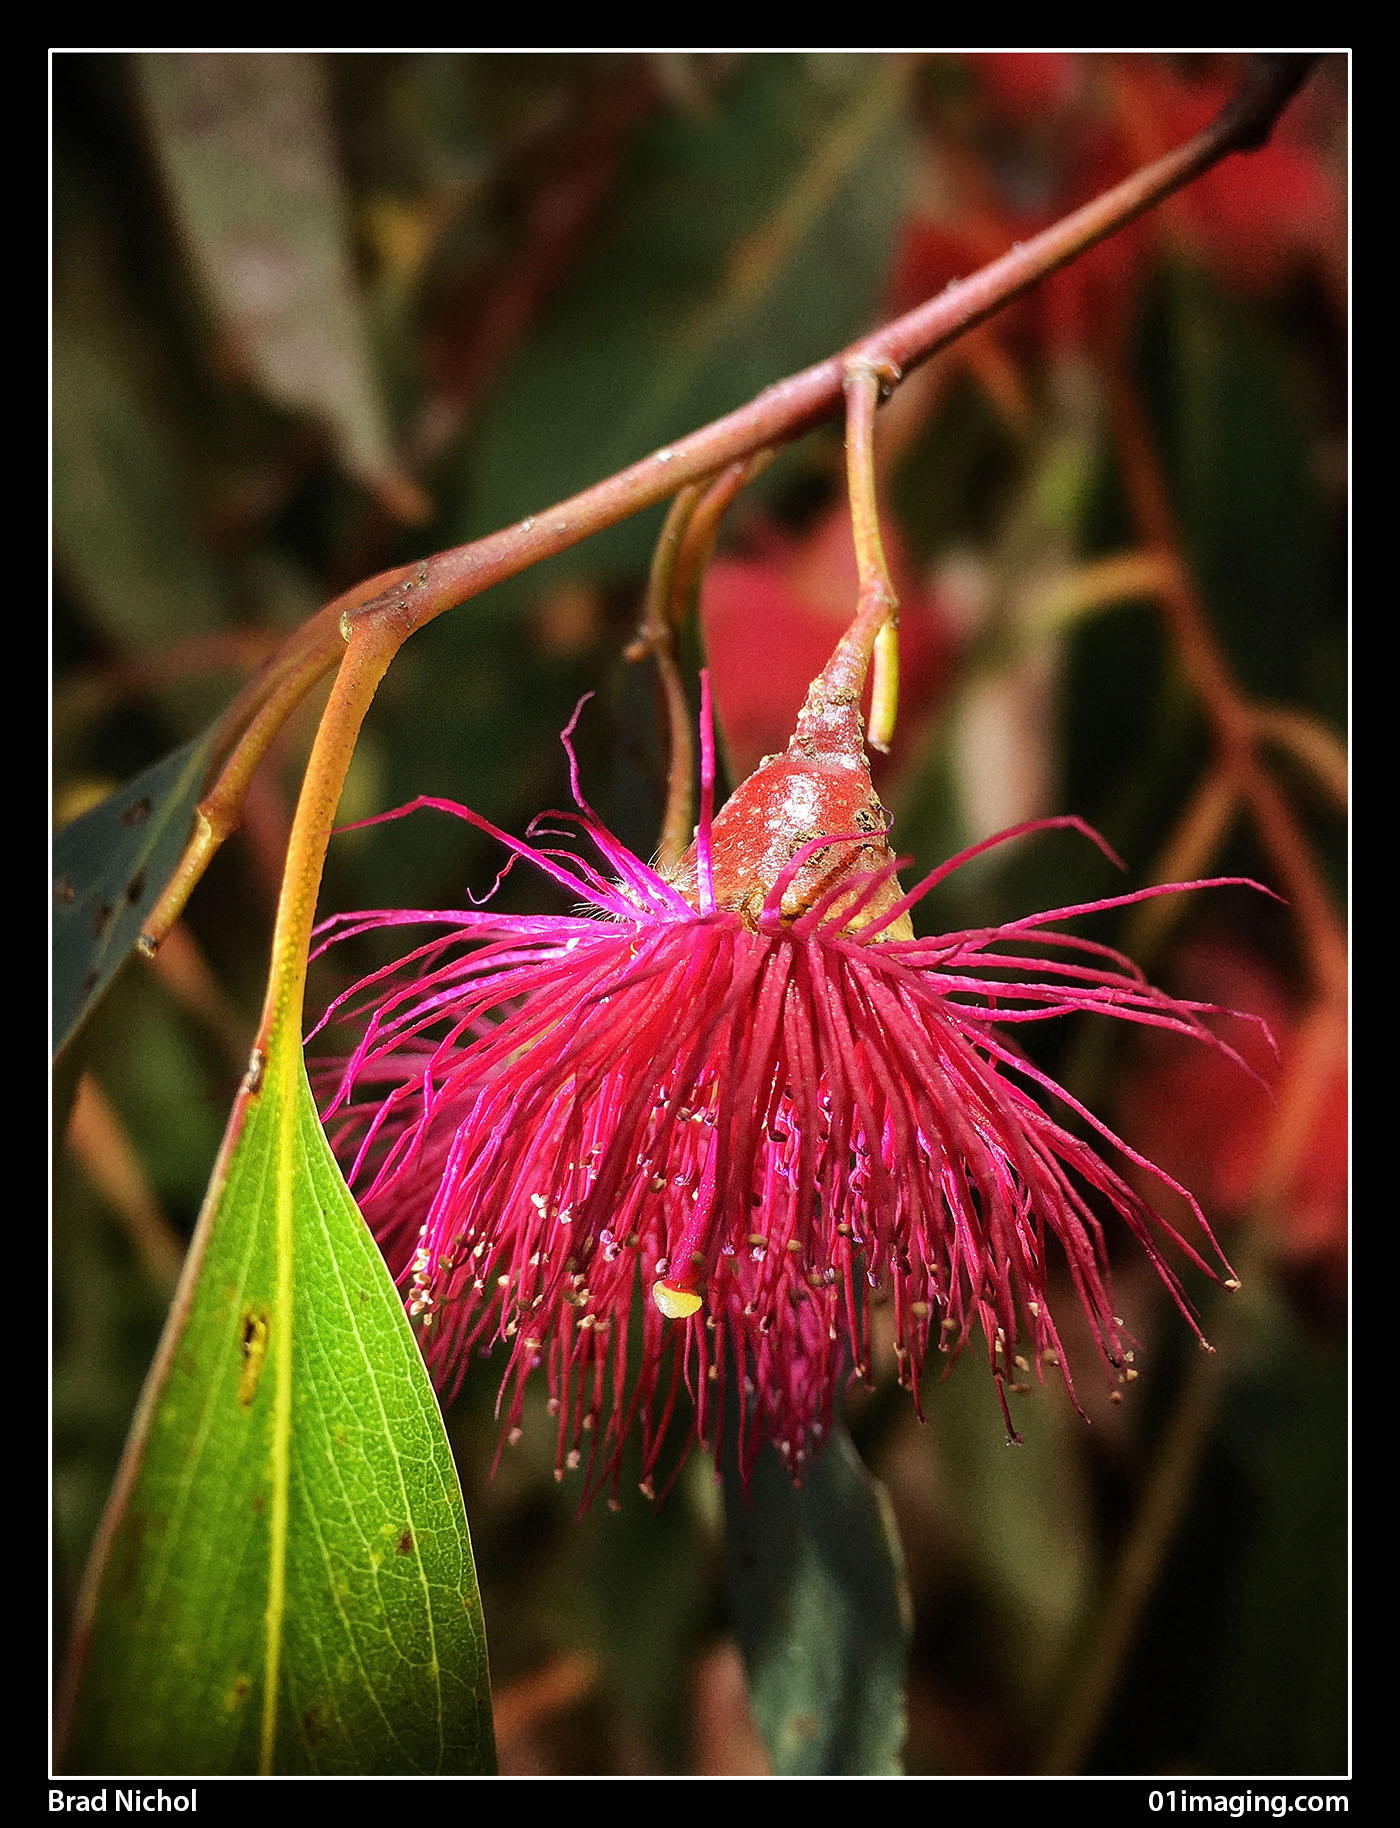
Yep the pic above was taken with an iPhone, it is the flower of a red flowering eucalyptus variety and right about now it and many other species of native Australian trees are bursting into spring bloom.
And no, just in case you are wondering this is not the product of laborious application of a dodgy lens blur app and you don’t need any special accessory lenses or hardware, in fact you can probably achieve this result with items you likely already have.
iPhones rock, no doubt about it, for many it is the “go to” camera, maybe their only camera, every day some new app or feature seems to add to the enormous repertoire of performance options, in fact it is pretty incredible what can be achieved, and you can even make a phone call if you wish.
Of course we are all aware of the iPhones’ limitations, it’s hard to get any real separation of depth and the bokeh such as it is, is not what you would call super creamy, the sensor is prone to burning out highlights and any degree of overexposure can lead to nasty colour shifts in those highlights. Additionally the focal length whilst great for most snapshot needs a little on the wide side for macro work and portraits.
Now just to be straight, the method I am about to describe will not help with shots that lay outside the macro range but it certainly can help with your macro and close to macro shots and provide a look that is for all intents and purposes a little closer to what you may achieve using a camera with a much larger sensor, at least in terms of bokeh.
So here is what you will need to Bokehrise your Macro shots.
An iPhone, ideally a later model with the higher resolution sensor, but it will work fine with earlier models.
An iPad or equivalent Android tablet, preferably the larger versions, but the iPad mini will work too with a few more limitations, an iPad Pro would open up even greater and larger possibilities.
A mini tripod and the head of a selfie stick so you can mount your iPhone solidly to the mini tripod to get sharper results, ideally the tripod should have a ball-head to make it easier to get the phone in a precise position.
Some small directional LED lights, I use a few cheap helmet miners style lamps I picked up from Aldi for about $4.99 each, small LED desk-lamps and work-lamps could be used as well.
Snapseed loaded onto your iPad and iPhone or other device, this is free photo editing app.
A camera replacement app for you phone that gives full white balance, exposure and focus control, I strongly recommend ProCamera for i device users. It costs a few dollars but is well worth the price.
That’s it, like I said most of it you have already and what you don’t have is free or cheap.
What are the advantages of Bokehrising?
Way better looking depth of field effects and bokeh
The option to better control the tonality of the background and avoid the bleachy burnies.
Much greater control over subject lighting.
Vastly reduced likelihood of subject movement
Consistent ability to stick with lower or lowest ISO setting and liberate a higher quality result.
A degree of background perspective control.
So what are we going to do?
Ok in short it goes like this, you take a photo of your background completely out of focus, you then load it onto your iPad, open up the file and use it as the background for your actual subject and shoot away. There is no fancy post capture editing needed and the results, well you can judge that from the pics in this article.

Why it works
There are a few things in play here that come together to give this reasonably unique look.
First smart phones have round apertures, so the out of focus areas whilst not normally being creamy smooth don’t have odd shaped blur points, thus the devices can, if treated appropriately, produce some reasonably nice bokeh results.
Separating the main subject capture from the background capture radically improves your control over the highlight rendering, which for many shots can be extremely harsh, giving that classic small sensor tonality.
By capturing the background separately you are able to use the cameras zoom function to give a more Telephoto perspective which helps removes distractions, after all we are not looking for detail and if needed you can even blur the backgrounds image noise away without effecting the clarity of your final subject.
Providing you have a reasonable working distance between the subject and the screen the pixels of the screen will not be seen.
We actually get three bites at blur creation, in the original capture, which can be blurrier than normal seen as it is just the background you are capturing, by further blurring the background in editing prior to the final capture and finally by having the additional distance between the subject and the screen, ultimately the sum total is complete blur control.
Treating the background and foreground separately means you have superior colour/white balance control interns of striking a balance between the artificial light sources illuminating your macro subject and the natural light on the background at the time of capture.
Often one of the biggest challenges in macro photography is subject movement and positioning, this way we are able to capture the subject in a fully controlled situation neatly eliminating the issues.
Of course there is a bit more to it if you want good or great results so lets get down to tin tacks and explore how to go about this in detail.
Part A) Background Capture
Choose something that is in keeping with the subject, in the case of the flower shots shown here I chose the actual plants that the flowers came off. Be very careful to avoid the highlights in the background bleaching out, which means you will need to control the exposure tightly. Also ensure that you have a correct white balance rendering, hence the need for an app that gives full WB control like that available in ProCamera.
The most important thing is to ensure your background is fully “out of focus”, again you need something like ProCamera to do this, though there are workarounds with the standard camera app if you really want to save those extra dollars.
Ensure the ISO is set as low as possible, which should be easy as it is likely the exposure compensation will be dialled back by about 1 to 2 stops anyway. Basically we want to limit noise so your background looks smoother without additional editing.
Take several versions of your background as it can be a little hard to pre-judge exactly what will look best.
Part B) Optional Background Edit
Edit you background in Snapseed making sure to keep the tonal range in check, in other words go for a slightly lower contrast rendering without clipped highlights, also fine tune the colour if needed and slightly tone down the saturation, this helps to increase separation the final image and gives a more natural rendering.
If you want even greater subject separation you can apply the radial or linear blur filters within Snapseed.
You can apply a vignette to the background if you want to add a little extra impact, the advantage in doing this at this now rather than later is your actual subject will not be vignetted which again will help it stand out better.
You can obtain a subtle but important perspective change by using the transform tool in Snapseed to adjust your background.
Part C) The Subject Capture
Support your iPad so it sits up nice and straight, I find that a couple large books work well.
Make sure you don’t have any random refections on the screen, be careful here as they are easy to miss and this is by far the most challenging aspect of the whole process. I ideally work in a darkened room/environment (remember the artificial lights are going to provide the subject illumination) and make sure you wear dark clothing so the colours don’t bounce of your screen.
Set your iPhone up on the mini pod.
Place your subject in front of the iPad, usually around 10cm or so but this will be subject dependent. It can be tricky to find ways to set up your subject so it might require a little creativity on your part, I find clothes pegs, plastic clamps, florists foam etc are all handy items to have at hand. Be careful not to go too close as the pixels may actually show up and in a worst case scenario get aliased by the blur from the camera which looks really crook.
Open up your background pic and adjust the brightness on your iPad screen so it fits in well with your subject, generally about half strength works fine.
Adjust the size of your background image by zooming in and out, this will give a different perspective look to your final image.
Open ProCamera and make a custom white balance using your lights to illuminate a white card or piece of paper, aim the card at an angle half way between your lights and the iPhone.
Set the focus precisely to where you want it, allow for the fact that depth of field will distributed about 50% in front and behind the point of focus when focused this close.(use the manual focus option)
Fine tune your framing and in this case use the cameras zoom function, yes normally I would not recommend it but in this case it works fine, we are only going to zoom to about 1.3 times (And that is why I suggested you are better off with the later model iPhones), you will still be left with adequate resolution for most regular needs.
Adjust the exposure compensation (with your lights in place and turned on of course)
Use the self timer function to trigger the camera.
Part D) (optional) Final Edit
You can edit to taste in Snapseed if you wish, I suggest that you might consider the following items.
Cropping to remove any stray bits of the iPad showing and improving the composition
Fine tuning the sharpness
Mild vignetting around the corners
Selective edits to control highlights or shadows
Cloning out annoying defects that often appear in macro shots due to magnification like dust spots and stray hairs and maybe the odd reflection if you weren’t careful enough.
Adding a frame
Really the editing is up to you, generally I have never created an image that didn’t benefit from at least a little editing but you choose what to do, I must add that I find some of the film simulation effects in Snapseed work really nicely with this type of imaging and the samples have had some subtle simulations applied complete with a bit of grain.
A few tips to help
You can throw the background even further out of focus when shooting if you hold a plus 4 diopter macro filter in front of the camera when you take the shot, with the focus locked at its closest setting, you may also choose to have some foreground elements almost in focus.
If the colour of the background and subject are at odds, then edit the colour balance of the background in Snapseed to get a better look before you start shooting the final shots.
If you shoot the background a little wide you can adjust the proportional size of the background elements by zooming it in or out on the tablet when you take the shots.
You can improve the look of your lighting in the final shot by using a white paper or card to bounce the light, diffusing it through shower curtain material etc. Paying extra attention to the lighting will pay dividends, just make sure you don’t get reflections on the screen.
Try to make sure the direction of your lighting on your subject is the same as the lighting in your background, otherwise it will look quite odd.
If you have a computer monitor with a large retina type display you could use that for your backgrounds to enable you to shoot much larger objects, although I have not included samples taken this way in this article I have done so and can confidently confirm a 27 inch Mac retina screen rocks big time for this method, allowing you to shoot much larger subjects with ease.
This is a technique that really benefits from a bit of forward planning, especially in relation to your backgrounds.
Finally there is nothing to stop you going the full monty and creating completely abstract background effects in Photoshop or something similar and using these behind you subject, have some fun, who knows what you might come up with.

Advanced Options
You could use an app like Hydra to increase the resolution of the final subject capture, though this will preclude much of the finer colour control offered in ProCamera. The main advantage is that it will allow you to zoom in closer for a much tighter perspective when capturing the final image.
You could use HDR capture methods to increase the dynamic range of your background or even subject capture.
You could use image/focus stacking via an app like Stay Focused to optimise the depth of field of the subject capture.
Why would you use it this technique?
- You just like to do fun stuff with your iPhone
- You only have a smartphone
- You need a quick and easy option for product pics for the web or small print options
- You need a combination of deep depth of field on the subject coupled with shallow Depth of Field on the background
- You rather like the flexibility and unique rendering the method offers
So there you have it, I reckon the results are really rather nice and definitely worth the effort, I would love to hear how you go, happy Bokehrising.
Brad Nichol
“Sent from my iPhone”


Good stuff. Congrats on article and pictures, enjoyed ir very much. Very creative and really emulates totally thin DOF. But on the other hand, as Dirk noted – a bit disconnecting from shooting pleasure, hunt itself.
I’m hooked on creating shallow dof pics with iphone myself – so, my 5 cents would be just to be very close to subject and keep phone steady – then you can get such results:
https://www.instagram.com/p/BJBKj17hMfB/
https://www.instagram.com/p/BKKrT3dBV4B/
https://www.instagram.com/p/BKKriX5hD1e/
https://www.instagram.com/p/BKK1DtnhRGu/
DOF is not that shallow, but its much much less complicated and leaves pleasure for picture hunting.
Hi, I checked your pics, love that last one, sweet composition, works very nicely. I agree though the technique I have discussed changed the process entirely, it is more akin to studio I guess, but there is still the hunt, the visualisation and of course lots of room for creativity. In the end it is another technique that photographers can add to their arsenal when they want a different look, I just hope people can have some fun with it. And thank you for your kind words, much appreciated.
You know, I spend 40 years of shooting flowers, going to the forest here almost daily in Spring, going to Spain on two week holidays, searching for backgrounds with perfect subjects and perfect light, coming home from these Spain holidays with perhaps ten beautiful, interesting shots.
With this method I can just shoot the perfect background, even make a library of them, carry them along and then select one of the millions of flowers, et… Voilà: the ultraperfect flower shot, more beautiful than what I’d ever find on my journeys.
This is brilliant. It will transform flower photography.
But… I get ultra relaxed and totally zen searching for the perfect image, I’m going to continue it the way I do, the shots may be not as ultraperfect as with this method, but my walks, searching, looking, discovering, just feel too good.
Congrats,
Dirk.
PS:
40 years ago, I experimented for three weeks with colored backgrounds on sheets of paper in nature, and flowers in a little studio, stopped it because it was not fun. You’ll have to figure out if this is fun, for you, but the potential is gigantic.
Dirk.
Hello Dirk
There is so much more to photography than the technique and end result, the journey and experience is for me at least just as important, I would love and savour those walks.
Thankyou for your kind comments and I hope this article opens up some new options for you.
Cheers
Brad
Well done Brad!
Great article! Will definately try it out with my phone and tablet. Will it only work with apple products though?